January 25, 2023
Reaching new heights: Hiking in Garmisch around and up the Zugspitze
Part 1 of our new outdoor blog series 'The most beautiful hikes'

The region around the Zugspitze offers a wide range of hiking options all year round with varying degrees of difficulty through wild and untouched landscapes.
What could be better than using the days to explore nature and enjoy the beauty of the mountains? We have decided to start a new outdoor blog series in which we will introduce you to the most beautiful hikes in Germany, Austria and Switzerland. In our outdoor blog posts, we will provide you with information about the different hiking trails, the views, the difficulty levels and everything you need for a successful hike. Look forward to breathtaking landscapes and be inspired. Follow us at alpinloacker.com or sign up for our newsletter so you don't miss any of the upcoming blog posts.
We'll start in Garmisch-Partenkirchen, Bavaria. The Zugspitze region with Germany's highest mountain is an experience for the senses and has over 300 kilometers of hiking trails. Only around an hour's drive from Munich, it is a popular destination in the border triangle and just as easy to reach by bus or train. Whether you are an experienced mountaineer, climbing enthusiast, family outing or trail runner, everyone will find a hike to suit their taste in the mountains around Garmisch-Partenkirchen. The Zugspitze at 2,962m is a must for every summiteer and, with a few tips and tricks, can also be managed by beginners. If you just want to enjoy the breathtaking view, you can take the Zugspitze cable car up. As there are no mountains of comparable height in the vicinity of the Zugspitze, you have the opportunity to discover four countries from there: Germany, Italy, Austria, and Switzerland. Some of the most striking peaks in the vicinity are the Grossglockner at 3,798 meters, the Wildspitze at 3,768 meters, the Ortler at 3,905 meters and the Piz Bernina at 4,049 meters.

The Zugspitze itself is Germany's highest mountain at 2,962m and requires a certain amount of experience and surefootedness.
Easy hiking trails with great views for the whole family
The many easy hikes in the region are a particularly popular choice for beginners and families. One highlight is definitely the ascent of the Wank mountain (elevation gain: approx. 1100 m - ascent & descent). It offers a breathtaking view of the mountain ranges and Zugspitze, as well as the famous Olympic ski jump. The Sonnenalm or Wankhaus are great places to stop for a bite to eat. The ascent can be a little strenuous in places - hiking poles can help here. The route can also be shortened as required thanks to the middle stations. For the little ones, it is a good idea to take the Wank cable car up and hike down at a leisurely pace.
An equally popular destination for easy hikes in Garmisch is the Eibsee - a picturesque lake with a magnificent view of the Zugspitze. The perfect circular hike including swimming fun in spring, summer and fall. In winter, the toboggan hike around the lake is very popular with families - however, there may be icy sections in places. Gaiters and Grödel boots are recommended here to protect against wet socks and slipping.
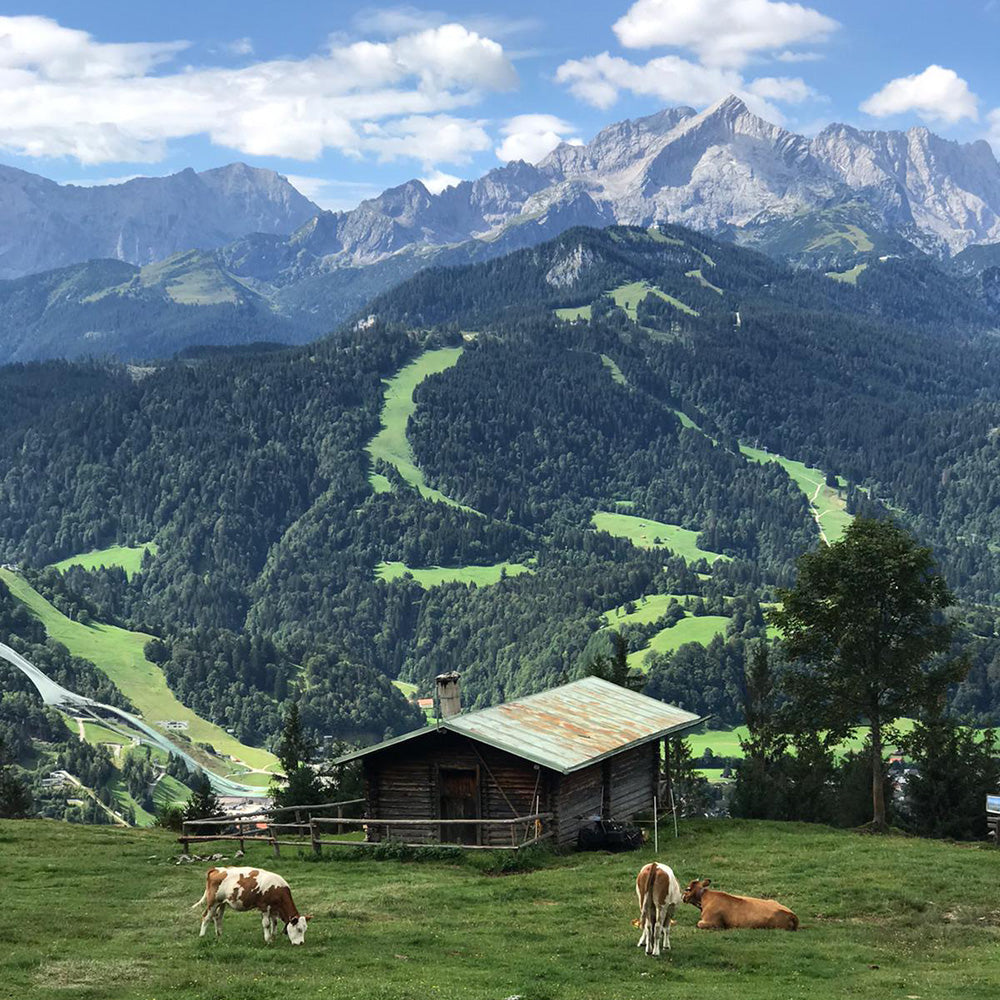
After an easy hike from the Wank mountain, you have a wonderful view of the Zugspitz region and the Olympic ski jump
Another highlight is a visit to the Partnachklamm gorge. An impressive gorge with a rushing mountain stream and spectacular rock formations. The path through the gorge is well developed and leads through narrow passages and over wooden bridges. The hike to the Partnach Gorge starts at the Olympic Stadium and runs along the Partnach river to the valley station of the Graseck cable car. An asphalt path then leads to the entrance of the gorge and along the river over bridges, tunnels and galleries with impressive views into the deeply carved gorge. At the end of the gorge, the Partnach River opens up into a wide valley that invites you to play and relax. As it can get quite wet in some places and there are many puddles, a rain jacket and rain gaiters are recommended for this section.
A varied return route leads via Graseck. The route continues along steep hairpin bends along the road to Wildenau, back to the starting point at the Olympic Stadium. The Partnach Gorge is open all year round (tickets can be purchased on site or online). In winter, you can admire the bizarre beauty of ice and snow. The path is lined with icicles, which in some places are even frozen into impressive curtains. The crystal-clear water of the river appears particularly blue, creating a special flair for an impressive experience. In the cold season, however, light crampons for hiking boots are highly recommended to reduce the risk of slipping. It is also definitely cooler and thermal clothing, such as merino underwear , is recommended.
For experienced hikers, the Partnach is the start of the classic route to the Zugspitze, which was taken by the first climber Josef Naus in 1820. Here you hike via the Bockhütte, the Reintalangerhütte and the Knorrhütte up to the Zugspitzplatt and then to the summit.

The Partnach Gorge offers mystical paths with a length of 699 meters and a depth of around 80 meters.

The Eibsee not only offers a chance to cool off after a long hike in summer, but also a breathtaking backdrop.
For summiteers
The famous Zugspitze is of course a must: the peak season for climbing is in summer from June to September. Caution: In early and late summer, it can still snow at higher altitudes - thermal clothing is essential here with constant temperature changes. Some routes - for example through the Höllental valley - are much trickier, so the right hiking equipment is also extremely important! Here we have listed 4 routes that lead to the Zugspitze. With the Zugspitzbahn, anyone can reach the top in seven minutes. By contrast, it takes seven to eight hours to climb on foot. Climbing the Zugspitze is physically demanding, but technically feasible - as long as you choose the right route, wear the right hiking clothing and have a good hydration system . Telescopic or foldable hiking poles are perfect here and protect joints and muscles. Lightweight crampons and gaiters help in muddy and icy places. The constant temperature changes require good hiking clothing - merino midlayers and merino underwear as well as insulating jackets and rain protection are recommended here.
1. The Reintal route is an easy trail that leads from Garmisch-Partenkirchen through the Partnachklamm gorge via the Reintalangerhütte (1370 meters) and Knorrhütte (2052 meters) to the "Sonnalpin" station. It is possible to shorten the route with the mountain railroad. Overnight stays in various huts are possible, but you should find out about capacity beforehand.
2. The Höllental route is the most challenging to the summit - it runs via the Höllentalangerhütte (1387 meters), which leads over a glacier and a via ferrata. Absolute experience in alpine sports and the right outdoor equipment are absolutely essential here, as is a head for heights. It is possible to book a guided tour with experienced mountain guides.
3. The via ferrata "Stopselzieher" is a via ferrata from Wiener Neustädter and requires surefootedness, a head for heights, good physical condition and good outdoor equipment. This climb is more challenging than the route through the Reintal valley and less spectacular than the route through the Höllental valley. Overnight stays in huts are possible, but you will often need your own sleeping bags, such as a hut sleeping bag , and food. It is advisable to find out about the regulations from the DAV in advance.
4. The Gatterl tour is an easy day tour that is 16 km long and leads over the Gatterl on the border between Germany and Austria. It is one of the easier routes to the Zugspitze. However, it is important to note that you are still in high alpine terrain here. There is also the option of using the glacier cable car from the Zugspitzplatt to the summit. The trail leads over scree and snowfields, past the Bavarian customs guard huts, to the serviced Knorrhütte. There is also a small via ferrata of approx. 100 meters in altitude to master, but it is very easy and can be done without a safety harness.

The Zugspitze - the highest mountain in Germany and home to the northernmost glacier in the Alpine region.
Conclusion
The list of hiking tours and countless opportunities for all kinds of mountain sports around the Zugspitze, Garmisch, the Karwendel mountains and the Alpine region is long. For most people, their first visit to the town of 26,000 inhabitants was certainly not their last. As Garmisch attracts not only hikers but also skiers, ice skaters and cyclists during the vacation season, it is best to visit in the quiet months between the main seasons. One thing is for sure - all mountain lovers will get their money's worth in Garmisch!
Related blog posts
Everything you need to know about hiking poles
Hiking poles are much more than just cool equipment. They offer you numerous advantages and make your hike an absolute highlight. However, there are still some prejudices and misconceptions.
The following blog post brings light into the darkness. Learn:
- What health benefits hiking poles have
- How to use trekking poles
- Which sticks suit you best
- How to adjust the poles
- What transport options are there?
- How you can recognize good hiking poles
Are you more of a video type? No problem, we go into the topic in detail in our buying advice
Video advice on hiking poles " How to find the right hiking poles
Why are hiking poles useful?
You have probably often asked yourself: "When are trekking poles even useful?" Why someone uses hiking poles can have very different reasons. In principle, they have Hiking poles many positive characteristics and advantages:
1. joint support
Hiking poles have a relieving effect
- feet,
- Legs,
- Knee
- and back.
Especially when walking downhill the knee will be very heavily loaded. By using your mountaineering poles, you save energy, your concentration doesn't wane so quickly, and you are safer when descending.

2. balance
Most accidents while hiking happen through slipping or stumbling. If you are also tired and your concentration drops, the risk of falling is even greater.
The hiking poles are like extensions of your arms that support you and give you better grip. This gives you additional stability and improves your sense of balance.
3. posture and breathing
Hikers who use trekking poles can simultaneously improve their posture. If you have a severe... Outdoors Backpack If you carry it on your back, the sticks support your upright posture. This relieves your spine in the best possible way.
Hiking poles namely provoke the walk in upright posture. It is almost impossible not to walk upright with hiking poles.
- Your shoulders cannot 'collapse' in front.
- In addition, the upright posture promotes breathing. You can breathe more easily.
Expert tip: Conscious breathing is essential in endurance sports so that you can concentrate for longer, you don't get tired so quickly and therefore remain accident-free.
4. security
As you can see from the previous points, hiking poles help you in many ways. You can stay accident-free for longer by...
- Your joints supported,
- promote your balance,
- You don't put additional strain on your posture, but rather promote a healthy posture.
In general, this walking aid has a positive effect on your energy balance, so you can really enjoy walking when hiking in the mountains with sticks.
5. nordic walking
The dynamic movement of Nordic walking
- strains the heart and circulation,
- stimulates metabolism,
- strengthens muscles and bones
- and tackles excess pounds.
If you diligently swing the mountaineering poles back and forth, you will also strengthen your arms, shoulders and back.

Step-by-step instructions: adjust hiking poles correctly

Step 1: Choose the right hiking poles
Before you adjust the hiking poles, it is important that you choose the right model for your needs. Pay attention to the length, material and handles of the poles to ensure they fit your height and hiking style.

Step 2: Determine the optimal length
TheHikingpoles should become demAdaptedto terrain. The poles should be slightly longer when descending and slightly shorter when ascending. As a rule, however, the mountaineering poles should be set as long as
- that the hand can easily grasp the handle,
- while the arm is at a right angle to the floor.
- The forearm is parallel to the floor and bent at the elbow.
Which hiking poles for which body size?
Many companies offer guidelines for the correct length for height. However, how a stick is adjusted can be very individual. As described above, it is important that the basic setting is at a right angle.
How long should Nordic walking poles be?
Since this question often arises specifically for Nordic walking poles, we will address this question separately here.
- The distance between the stick and your body should be about half an arm's length.
- When your arm is bent at a 90 degree angle, the sticks should end at your forearms.
- The 90 degree principle is exactly the same as with conventional "trekking poles".
- Additionally there is the method for calculating the length. To do this, multiply your height in centimeters by 0.7. The result is the stick length.

Step 3: Adjust the height of the hiking poles
Look for the adjustment mechanism on your hiking poles. This can be a twist lock, a folding system or a snap lock. Loosen the clasp to adjust the poles. Pull or push the telescopic rods to adjust the desired height. Make sure the marks on the pieces match to ensure both sticks are set at the same height.

Step 4: Adjust the hand straps
Hiking poles usually come with hand straps that allow you to hold the poles without tightly gripping them. Slip your hand through the loop and adjust the size of the loop so that it fits comfortably. You should adjust the strap so that you can easily slide it in and out without it being too loose or too tight.

Step 5: Check the tips
Check the tips of your hiking poles to make sure they are intact and sharp enough to provide good grip on various surfaces. If necessary, you can swap out the tips or replace worn tips.
Step 6: Test run and fine adjustment
Before you go on a longer hike with the hiking poles you have adjusted, do a short test run. Take a few steps and check that the length and settings are comfortable and feel good. Adjust settings as needed to achieve the optimal hiking experience.
How do you walk properly with hiking poles?
When hiking, we often just start walking without thinking about our walking technique. This is not surprising either. After all, our running is automated.
However, if you have the full If you want to use the potential of your trekking poles, you should pay attention to a few points when using them:
1. adjust the size correctly
First of all, adjust your hiking poles to the correct size. See our step-by-step instructions.
2. hold the handle correctly
A common mistake is the wrong grip, where the loop is often simply threaded from above. You should correctly reach through the loop from below so that you can exert pressure on the pole even with an open or loose hand.
This allows you to open your hands during the backswing without sacrificing any relief.
Expert tip: To prevent your hands from cramping up, you should make sure to keep your grip loose when making the swing.
Important: The loop should only be used on relatively flat terrain. If you fall and become entangled, you will not be able to grab the handle or support yourself. The risk of injury is therefore much higher.
3. correct posture
To achieve the best possible effect, it is advisable to always hold the sticks close to your body. On flat terrain, the poles are diagonal to the legs and are used alternately, according to the natural movement pattern.
4. walking on steep terrain
In steep terrain, double-decker use is the variant you should use. When ascending and descending, the poles are usually placed every other step and you push yourself up powerfully with both arms. This ensures stability and relief.
5. go downhill
The double-deck technique is also the best choice when going downhill. You should not drill the tips of the poles into the terrain, but rather grip or hold the handle so that you can perform a clean technique. This way you don't slip and avoid falls.
6. crossings
When crossing, poles do not necessarily have to be adjusted differently. It is enough if you hold the uphill pole below the handle and on the downhill side grasp the handle like a knob from above.
7. very steep terrain and traverses
You should pass through very steep terrain and traverses without using loops. The stick should 'only' be used as a support. There is also the option of holding a stick with both hands.
"It's an old method, the way mountaineers did it back then. According to Wolfgang Loacker, experienced mountain and ski guide in Montafon."
In principle, you should only walk on steep terrain if you are fit enough and have experience, or have an expert with you.
Attach folding sticks to the backpack
On some stages or on buses and trains you don't need your hiking poles. Folding sticks have a decisive advantage here.
They can be folded up in no time and are extremely easy to transport due to their small pack size and weight. This is what you should know about transporting your hiking poles:
The sticks in the backpack
Ideally, you should not attach any equipment to the outside of the backpack.
"It is safer to keep trekking poles in your backpack. On the one hand, they can easily get lost and if you fall, the risk of injury is higher," says Wolfgang Loacker, Austrian mountain and ski guide.
In addition, mountain hiking is done with sticks Hiking backpack are attached, more difficult and dangerous. The weight pulls backwards and downwards. This puts strain on your spine and takes strength.
The tip on the backpack
The attachment option depends very much on your backpack. In most cases, trekking and hiking backpacks have loops and hooks that make it possible to insert and thread the poles.
For loops (the tip) is inserted at the bottom. The small loop is used for sticks without plates, and the large loop is used for sticks with plates.
The plates usually prevent the stick tips from slipping. Otherwise you can Stick plate can also be turned down in just a few steps.
Compression straps
Compression straps are mostly loops on the right or left of the backpack that can be tightened. The hiking poles are, so to speak, enclosed and tightened. This means your poles don't swing back and forth and sit firmly and securely on your backpack.
Velcro and cable ties
An alternative are external Velcro fasteners and cable ties to secure hiking poles to the backpack. These methods require that you already have an existing system on your backpack where you can thread your external Velcro or cable ties. Especially the Velcro method is only for him Suitable for transport.
How do I transport hiking poles on a plane?
Hiking or trekking poles are not allowed in hand luggage. That also applies to telescope Hiking polesthat can be pushed together. The reason for this is that hiking or trekking poles are considered dangerous items at security checkpoints because they can potentially be used as weapons.
Hiking poles can only get picked up in checked baggage. Foldable or telescopic hiking poles are an advantage here. These can easily be stored in a suitcase or backpack. There is no additional fee to pay and the suitcase can be packed to save space.
At non-foldable sticks must have one additional fee must be paid because it is bulky luggage and this type of sticks does not fit in the suitcase. The only exception to hand luggage is walking aids such as crutches or canes if they are necessary for a medical reason.
Which tip for which surface?
On your tour you will often be confronted with different surfaces. That's why our hiking poles also come with various attachments.
- Asphalt attachments are particularly suitable for use on hard surfaces. They protect the metal tip on the hiking pole from unnecessary abrasion.
- For use in the mountains, you should use your poles without an additional attachment.
- Unless you're hiking over scree. We recommend screwing on the mud attachments here. They prevent sinking. As the name suggests, you can also use these in mud, on earth and sand.
The included Nordic walking attachments make it easier for you to walk quickly and push your speed.
Can I hike on snow and ice with hiking poles?
Yes! Thanks to the included snow plates, you can also use your hiking poles in winter. The attachments are ideal for use on snow. If you want to cross ice-covered passages, you should use the tip without an attachment. This gives you maximum support.
Conclusion: What are good hiking poles?
Your own needs come first. This is the first clue as to how you should choose your sticks so that it becomes a "good" stick for you. Height and body weight will help you in this regard. When it comes to good hiking poles, the second priority should always be the price-performance ratio. Comparisons and experience reports can help here.
If you are not sure what occasions you will use the poles for, it is advisable not to store too specifically. But a few sticksthatfor multiple areas of application can be used to purchase.
Otherwise, it is important to choose poles based on their intended use. If you mainly need the poles for relaxed hikes in the flatlands, aluminum telescopic poles should be sufficient.
However, if you also want to go on multi-day tours or in the mountains, foldable aluminum or carbon poles are recommended. There is no clear answer as to what makes a good hiking stick and what doesn't.
If used incorrectly and handled incorrectly, the most expensive and lightest carbon pole will no longer be of any use to you. It is much more important to deal with the material and know your own needs in order to choose a suitable stick.
FAQ on the topic of hiking poles:
Should I choose fixed or telescopic hiking poles?
Of course, this question cannot be answered in general. The use of the different models is, on the one hand, a matter of taste. On the other hand, it also depends on the area of application. If you value low weight and small pack size, you should choose telescopic hiking poles.
These are set up and ready for use in no time. If, on the other hand, you value stiffness and demand a lot from the poles, then solid hiking poles are more suitable.
My hiking poles can no longer be detected: what can I do?
If your hiking poles can no longer be locked, there are some possible solutions you can try:
Check the closures: Make sure the clasps or clamps on the hiking poles are closed properly. Sometimes they can accidentally come loose or not lock properly.
Clean the sticks: Dirt, sand or moisture can affect the mechanisms of the hiking poles. Clean the poles thoroughly to ensure they are working properly.
Grease the fasteners: If the latches are stuck or difficult to move, you can apply some lubricant or silicone spray to the mechanisms to make them move smoothly again.
How do I clean my hiking poles?
When treated properly and cared for, hiking poles can be a reliable companion for many years. If your hiking poles get wet, you should adjust them to their full length and wipe them with a clean cloth. This also applies if your poles have come into contact with dirt or dust.
Be sure to avoid dirt getting into the individual segments, as this can impair functionality. If you give your hiking poles a longer break, be sure to store them in a dry and clean place. A damp basement or garage are not suitable.


